
Hinata Hyuga is one of the most beloved characters in the Naruto universe. Known for her gentle nature, unique Byakugan eyes, and iconic hime-style short haircut, drawing her face is a fantastic way to practice classic female anime features and facial proportions.
In this step-by-step tutorial, we will break down the entire process into 6 manageable steps—from basic geometric guidelines to the final detailed line work, including her signature Hidden Leaf headband worn around her neck.
Whether you are drawing digitally or using pencil and paper, grab your tools and let’s get started!
Tutorial Overview
| Difficulty Level | Estimated Time | Focus Areas |
|---|---|---|
| Beginner to Intermediate | 20 – 30 Minutes | Head proportions, Byakugan eyes, anime hair volume, headband detail |
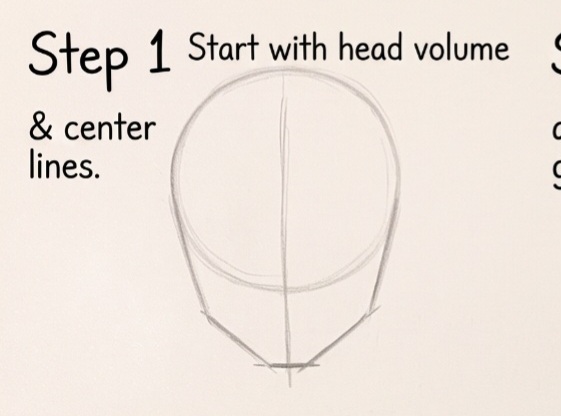
Step 1: Lay Down the Head Volume & Center Guidelines
The foundation of any great anime face starts with basic structural shapes.
- Draw a Circle: Start by drawing a light circle for the top section of the head (the cranial volume).
- Add the Jaw Line: Draw two angled lines sloping downward from the sides of the circle, meeting at a flattened point at the bottom to form a soft V-shaped chin.
- Add Symmetry Guidelines: Sketch a central vertical line running down the entire face to keep features aligned, followed by a light horizontal guide line near the lower half of the circle.
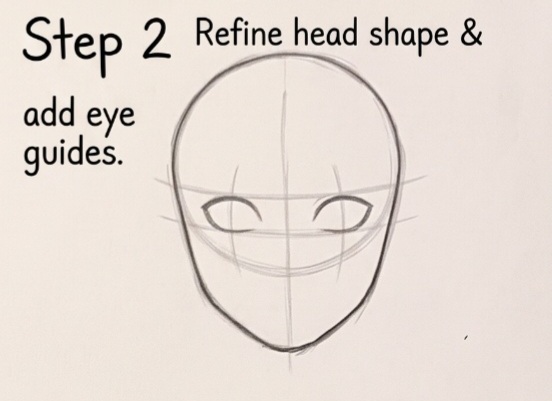
Step 2: Refine the Face Shape & Add Eye Guides
Now that the core structure is set, let’s refine the face shape and prepare the layout for Hinata’s large anime eyes.
- Refine the Jawline: Smooth out the cheekbones and chin contour so the face looks soft and youthful.
- Add Horizontal Eye Guidelines: Draw two curved parallel lines across the middle of the face to mark the top and bottom boundaries for her eyes.
- Block Out Eye Curves: Place two simple almond shapes within the guidelines on either side of the center vertical axis. Ensure there is roughly one eye’s width of spacing between them.
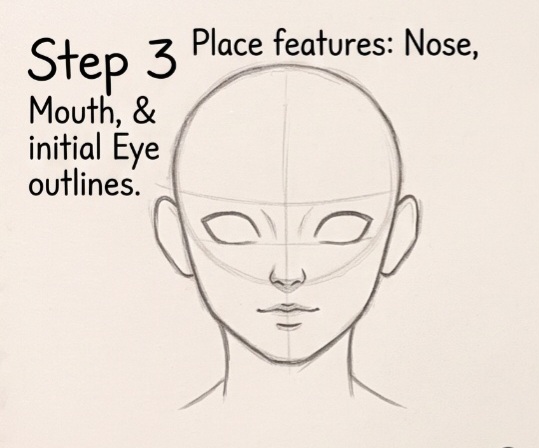
Step 3: Place Facial Features (Nose, Mouth, & Outer Outline)
With the head structure established, it’s time to place her core facial features and ear foundations.
- Draw the Nose: Place a small, subtle nose tip centered on the vertical line just below the lower eye line.
- Draw the Mouth: Sketch a gentle, slightly curved line for her closed, soft expression, with a subtle lip contour directly beneath it.
- Position the Ears: Outline the outer curved shape of the ears along the sides of the head, spanning vertically from eye level down to the base of the nose.
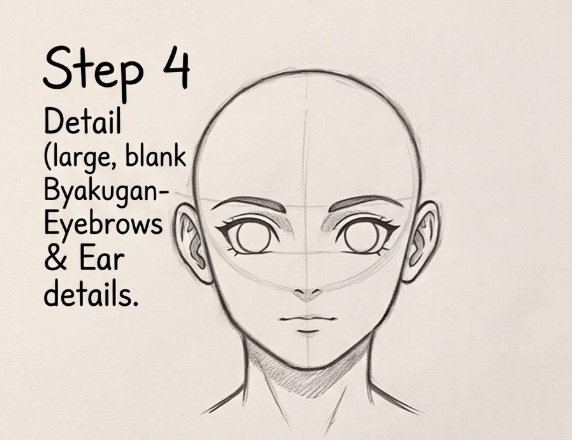
Step 4: Detail the Byakugan Eyes, Eyebrows & Ears
Hinata’s most recognizable feature is her Byakugan—the Hyuga clan’s legendary kekkei genkai.
- Define the Eyelashes: Darken the upper eye line with a thick, defined anime lash curve, adding small wing tips on the outer edges.
- Render the Byakugan Iris: Draw large, blank circular irises inside the eyes. Unlike typical anime characters, Hinata’s eyes do not have dark pupils; leave the center clear with bold iris rings.
- Add Eyebrows & Ear Details: Draw soft, slightly arched eyebrows above the eye guidelines to convey a gentle demeanor. Add internal fold lines to the ears, and add soft hatch shading under the chin for depth.
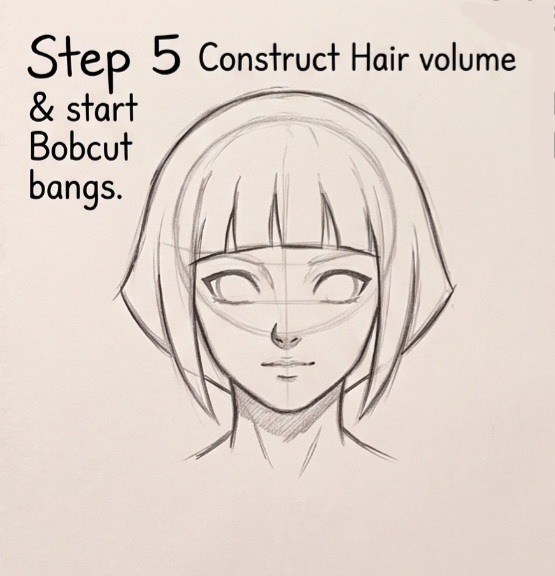
Step 5: Construct Hair Volume & Block Out Bobcut Bangs
Anime hair should never be drawn flat against the skull. It needs “volume” or air space around the head line.
- Draw the Hair Dome Outline: Sketch an outer arc slightly above the skull circle to establish hair volume.
- Draft the Front Bangs: Draw straight, blunt-cut hime bangs hanging down across her forehead, ending just above the eyebrow line. Leave small triangular gaps between bang strands.
- Frame the Face: Add long side locks on either side of her cheeks to frame her face in her classic Part 1 bobcut style.
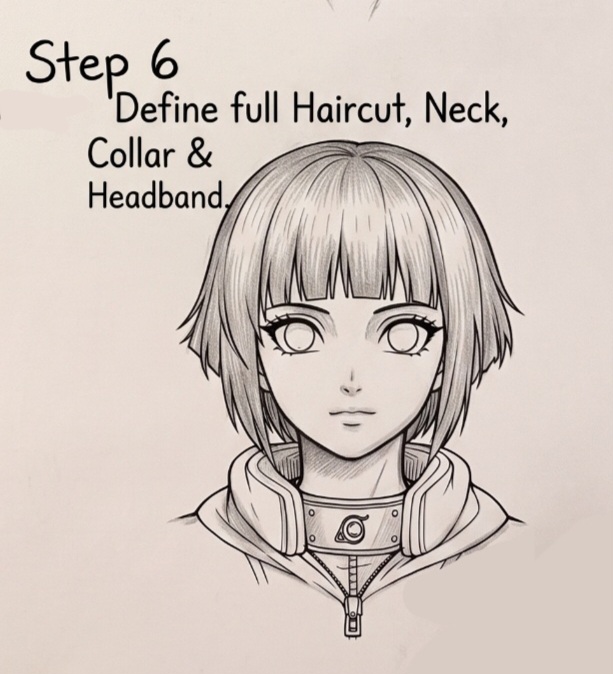
Step 6: Finalize Haircut, Neck, Collar & Headband
In this final step, refine your sketch with clean linework, detailed shading, and her signature outfit elements.
- Refine Fine Hair Texture: Add fine, vertical stroke lines along the hair strands to give the bobcut texture and shine.
- Draw the Neck & Collar: Extend two clean neck lines downward and add her jacket collar with zipper details around the base.
- Add the Leaf Village Headband: Hinata uniquely wears her Hidden Leaf ninja headband around her neck like a choker. Draw the fabric band, the metallic forehead plate, and the engraved Leaf Village symbol in the center.
- Clean Up Guidelines: Erase any remaining construction lines from Steps 1–3 to reveal your finished artwork!
Pro Artist Tips for Drawing Hinata Hyuga
1. Mastering the Byakugan Look:
Avoid adding dark black pupils! The key to the Hyuga clan’s Byakugan eyes is maintaining a soft, semi-blank look with prominent iris outlines and faint inner highlight rings.
2. Capturing Her Expression:
Hinata’s expression is usually subtle, shy, and sweet. Keep the mouth small and relaxed, and avoid overly steep or angry eyebrow angles.
3. Getting the Bangs Right:
Her front bangs follow a classic Japanese hime cut (princess cut)—straight horizontal edges with neat, slight vertical gaps.
Frequently Asked Questions (FAQ)
What is unique about drawing Hinata’s eyes compared to other Naruto characters?
Hinata belongs to the Hyuga Clan, possessing the Byakugan. Unlike Naruto or Sakura, her eyes do not have dark pupils. Instead, they feature pale irises framed by distinct double concentric rings or thick outer eyelashes.
How do I make the hair look natural instead of flat?
Always sketch a head-sphere construction guideline first, then draw the hair outline 1 to 2 centimeters above the scalp guideline. This adds realistic depth and volume to her bobcut.
Share Your Artwork!
Congratulations! You’ve successfully drawn Hinata Hyuga’s face step by step. Practice these steps a few times to build muscle memory for head proportions and anime hair framing.
Did you enjoy this guide? Drop a comment below letting us know which Naruto character you’d like us to cover next, and don’t forget to bookmark HowDrawManga.com for more step-by-step manga drawing tutorials!